Jonathan Ochshorn
Schedules contain information about related items such as doors, windows, or room finishes.
Where information about such items is best organized in tabular form, schedules can be used.
Schedules may contain only text within the tabular fields, or they can contain images/diagrams in cases where such drawings are small enough to easily fit into a tabular format. Otherwise, where related drawings are too big, the schedule can refer to their location within the drawing set.
Schedules may appear in the drawing set (in which case their size should be consistent with the drawing block modules established for the set), or they may appear in the specifications (in which case their location is determined by Masterformat numbers). The choice is partly pragmatic—what is easier to do—and partly based on a consideration of what works best in the field (i.e., how useful is it for builders to have access to the schedules as they examine the drawings). Size also matters: if the schedule becomes quite wide, it may need to be included in the drawings just so it can fit on a single page.
A schedule has a minimum of four parts: heading (title); mark (identifies the particular item); item description; and distinguishing feature (defining characteristics—there may be several such columns), with this general form:
| HEADING | ||
|---|---|---|
| MARK | ITEM DESCRIPTION | DISTINGUISHING FEATURE |
A schedule cannot have only two columns: this would correspond to some sort of list, such as a legend, or a key. A schedule contains at least three columns and often more.
If the schedule is very wide, with multiple columns of data, it is sometimes useful to repeat the "mark" column on the right side, as shown below
| HEADING | ||||
|---|---|---|---|---|
| MARK | ITEM DESCRIPTION | DISTINGUISHING FEATURE | DISTINGUISHING FEATURE | MARK |
A "Notes" column is often useful, when there are lots of distinguishing features, none of which warrants its own column. This column may refer to a legend shown next to the schedule, or may reference other drawings or spec items. In general, it's better to use some sort of "key letter or number" instead of writing out each note—this saves space and makes the schedule easier to read:
| HEADING | ||||
|---|---|---|---|---|
| MARK | ITEM DESCRIPTION | DISTINGUISHING FEATURE | DISTINGUISHING FEATURE | NOTES |
| 1 | ||||
| 1, 3 | ||||
| 2 | ||||
Tempered glass in bottom panel
Aluminum backsplash
See detail 2A5.45
Schedules often need to be a bit more complex, so that an item description or distinguishing feature may well be subdivided into two or more columns:
| HEADING | ||||||
|---|---|---|---|---|---|---|
| MARK | TITLE | TITLE | TITLE | |||
| SUB-TITLE | SUB-TITLE | SUB-TITLE | SUB-TITLE | SUB-TITLE | ||
| ROW ID | INFO | INFO | INFO | INFO | INFO | INFO |
| ROW ID | INFO | INFO | INFO | INFO | INFO | INFO |
| ROW ID | INFO | INFO | INFO | INFO | INFO | INFO |
Many different types of schedules can be created for any particular project. The list provided in the National CAD Standard includes things like:
We will only examine three common schedule types: room finish; door and frame; and window.
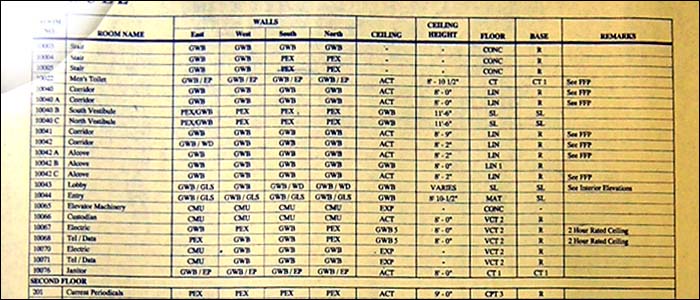
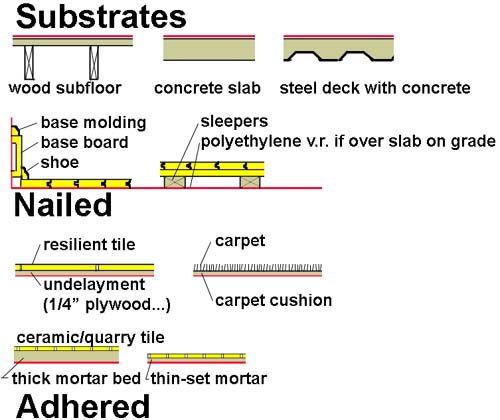
For each room or space in a building, the various floor, wall, and ceiling finishes can be tabulated in a schedule. Examples of floor finishes include carpet, resilient tile, or wood; wall finishes include things like gypsum board (painted), plaster, or wood paneling; ceilings can be made from things like suspended acoustical tile or gypsum board.
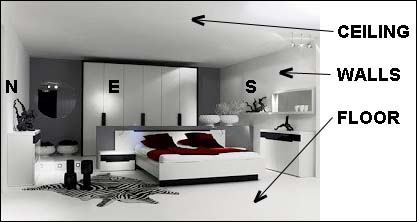
The most common way to distinguish between the various wall surfaces in a typical room is to subdivide the "walls" category into four columns representing north, east, south, and west elevations. Where the building isn't exactly oriented to these cardinal directions, a "plan north" is established on the site plan. Where room geometries are too complex or random to use such a system, you're on your own" figure out something clear and logical for your project.
Where finished ceiling heights vary, it is often convenient to include a "height" column under "ceilings," rather than having the ceiling installer figure out such things by looking through sections. Where the ceiling geometry is more complex, it may be necessary to refer to reflected ceiling plans, elevations, or sections to communicate that information. Each project is different, and the drawings, schedules, and specifications should respond to the unique characteristics of each project.
| ROOM FINISH SCHEDULE | ||||||||||
|---|---|---|---|---|---|---|---|---|---|---|
| ROOM NO. | ROOM NAME | FLOOR | WALLS | BASE | CEILING | NOTES | ||||
| N | E | S | W | MATL | HEIGHT | |||||
| 101 | Office | 4 | 1 | 1, 2 | 1 | 1 | vinyl | 6 | 8'-2" | 8 |
| 102 | Office | 4 | 1 | 3 | 1 | 1 | vinyl | 1 | 8'-0" | 7 |
| 103 | Office | 4 | 1 | 1, 2 | 1 | 1 | wood | 1 | 8'-0" | |
Gypsum board, painted
Vinyl wall covering
Wood paneling
Carpet
Ceramic tile
Suspended Acoustic Tile
See room elevations for panel location
See reflected ceiling plan for grid location
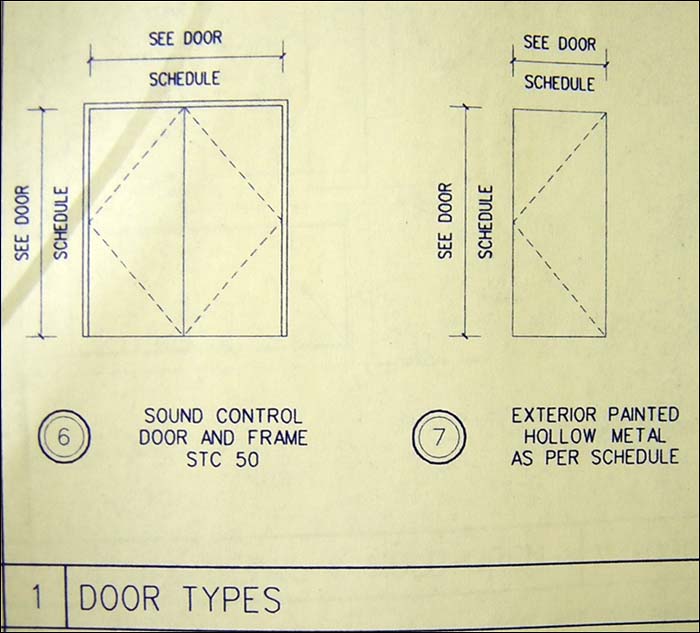
There are many ways to identify and describe doors in a project. Each door may be identified with a symbol including keys to its size, type, and material. Alternatively, doors can be identified by the rooms they provide entry to, or they can be individually identified with a door number, or they can be identified with a door type. For any of these models, a schedule can be designed that refers to the chosen mode of designation. Often, there are many variations within a particular "theme," and the schedule can organize these variations without creating redundant elevations or details for each minor variation. For example, an ordinary steel door and frame can have a variant in which a glazing panel is included, or a louver (to allow air to pass through), etc.
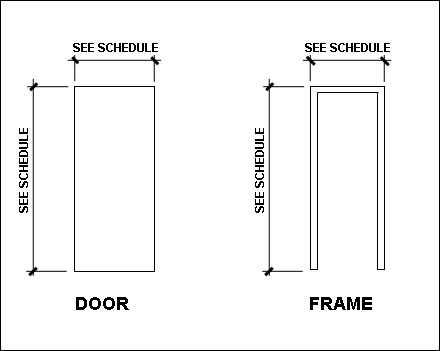
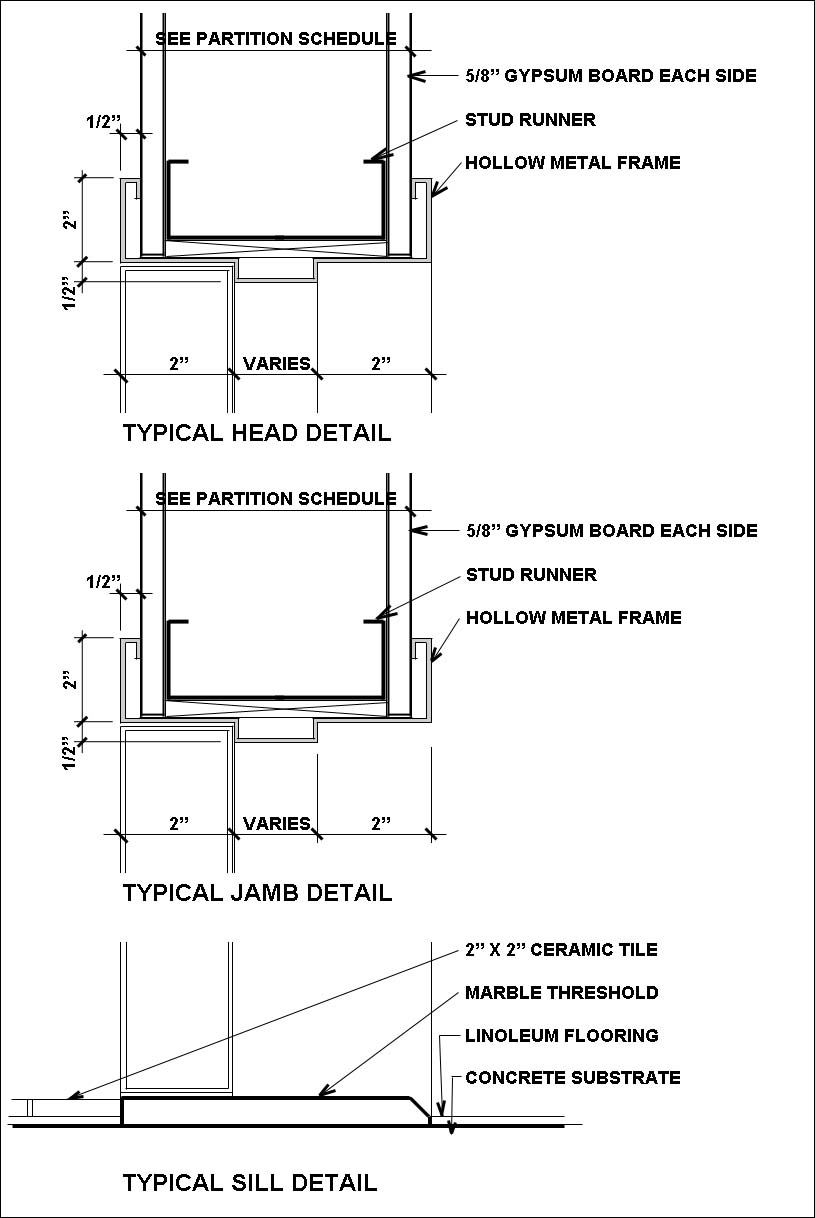
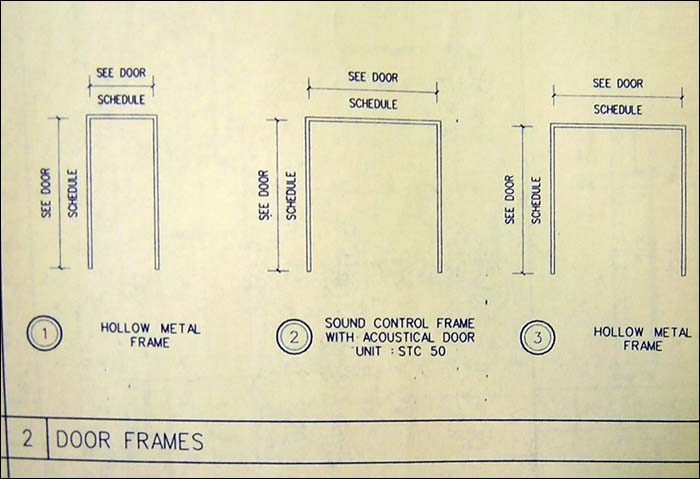
Doors and frames are typically identified separately, although often within a combined schedule. So, for example, one might have a wooden door in a steel frame—the separate columns for "door" and "frame" organize this information. Details for both doors and frames are also referenced in the schedule, and usually drawn close by. There are two primary types of drawings used: First, door and frame elevations (abbreviated as "EL" in the schedule) show the overall shape and dimensions, although the height and width may be shown as variables on the drawing so that the actual values can be tabulated in the schedule. This allows a single elevation to serve for more than one door or frame variation. Second, detail sections of the various frame types cut at the head, sill, and jamb are drawn—these details are then referenced from the schedule.
The fire rating label column is used to identify those door-frame assemblies that require some fire-resistance rating. For example, the Underwriters Laboratiry (UL) labels doors with letter codes: A = 3 hours; B = 1-1/2 hours; and so on. See this chart for examples.
The labels are fixed to the edge of each rated door so that the fire rating can be verified in the field.Hardware includes knobs, latches, locksets, hinges, and so forth. It turns out that this is a rather tricky thing to specify, and architects often utilize the services of hardware manufacturers to help out with such specifications. The column for "Keyside Rm No" indicates which of the two spaces on either side of a given door is the "key" side. In many cases, this is obvious (e.g., a room facing a corridor), but in other instances, it might not be clear. This is also something that is increasingly being added within parametric building models (BIM) for doors and frames—so that the schedule can be created automatically from such "intelligent" drawings.
Finally, the "notes" column allows the architect to indicate special conditions that are important, but not prevalent enough to warrant a separate column or a separate door/frame type.
| DOOR AND FRAME SCHEDULE | ||||||||||||||||||
|---|---|---|---|---|---|---|---|---|---|---|---|---|---|---|---|---|---|---|
The door and frame elevations are usually quite simple, and often are not explicitly dimensioned.

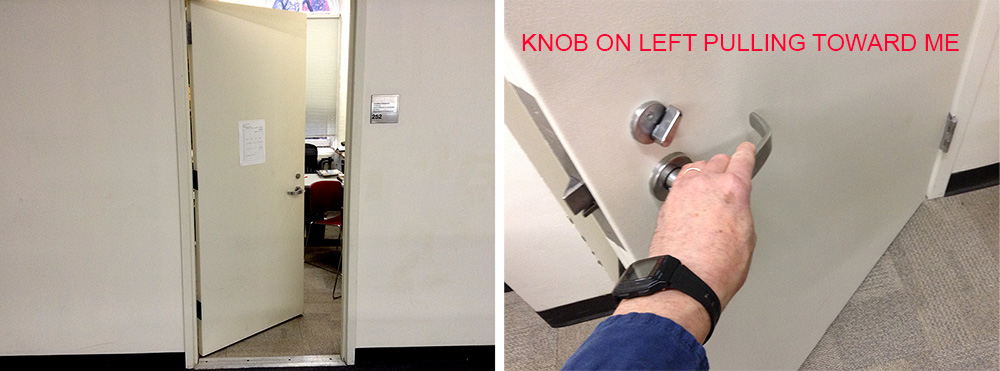
Handedneses
A picture of a door-swing in a plan shows how it opens, but...
To specify a door (with text only, no pictures), its "handedness" needs to be indicated: either left handed or right handed.
When pulling a door knob (i.e., with your hand) towards you, it is left handed if you use your left hand (the knob is on your left), or right handed if you use your right hand (the knob is on your right).
For exterior doors, also indicate "in-swinging" or "out-swinging" since it makes a difference in terms of hardware and finish.
For additional information, see the National CAD Standard - V5, Uniform Drawing System, Module 4 (Drafting Conventions), Section 4.3 Sheet Types.
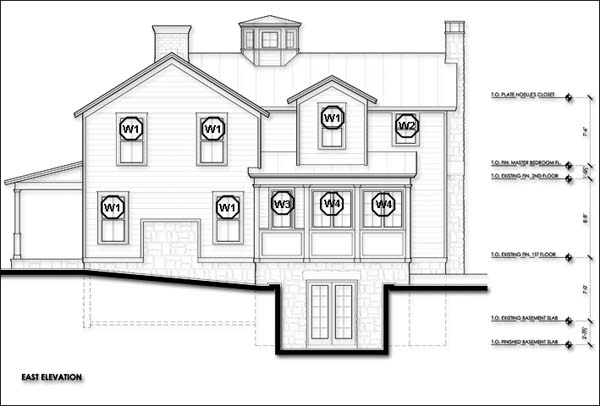
Unlike doors, which are identified (keyed in) on floor plans, windows are more commonly identified on building elevations.
| WINDOW SCHEDULE | ||||||||||||
|---|---|---|---|---|---|---|---|---|---|---|---|---|
| W1 | ||||||||||||
| W2 | ||||||||||||
| W3 | ||||||||||||
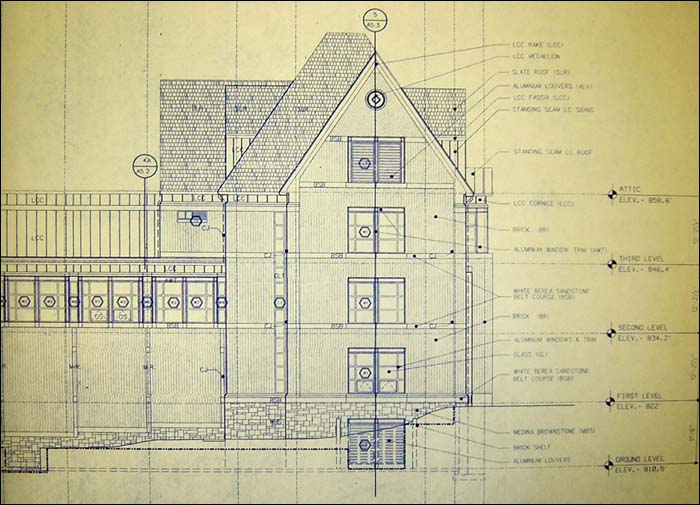
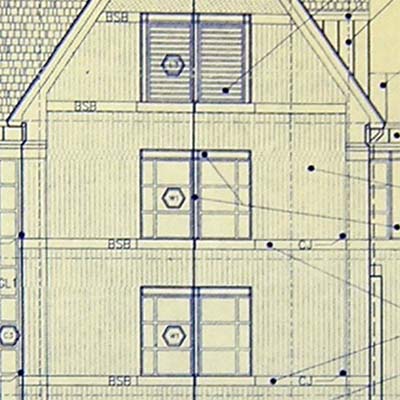
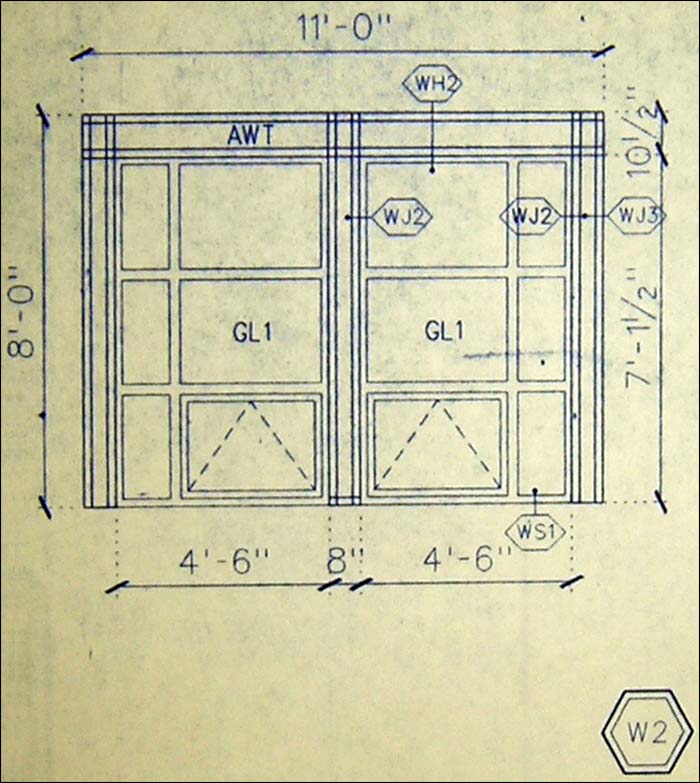
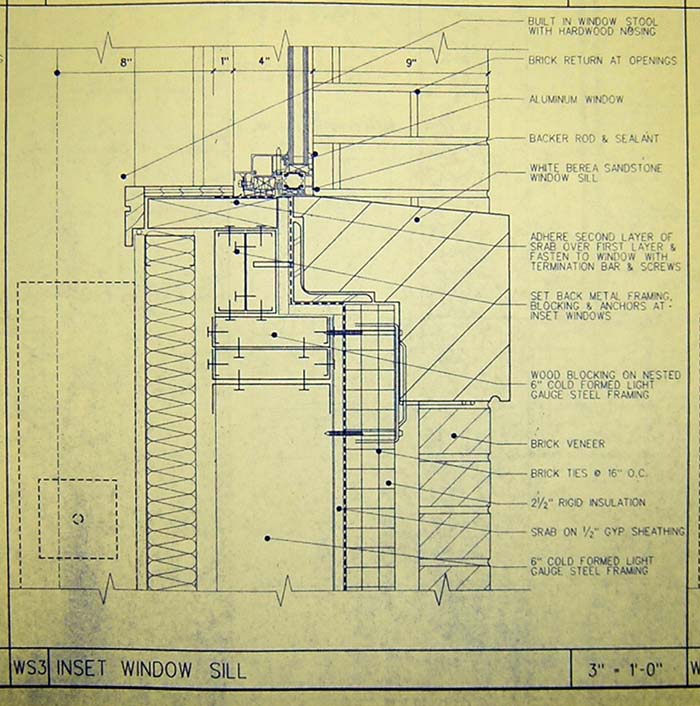
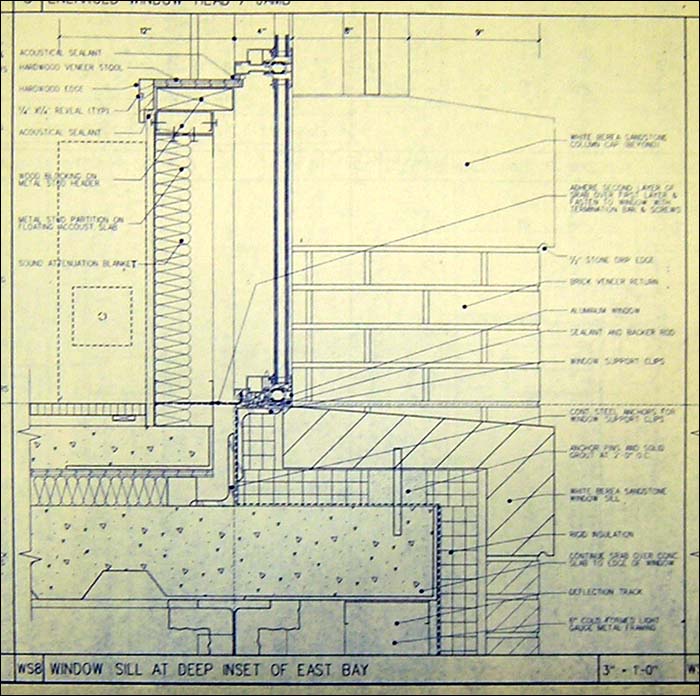
Lincoln Hall example:
For this project, there was no window schedule. Instead, window designations were marked on the building elevations, and those elevations were redrawn on a "window" detail sheet along with head, sill, and jamb details.
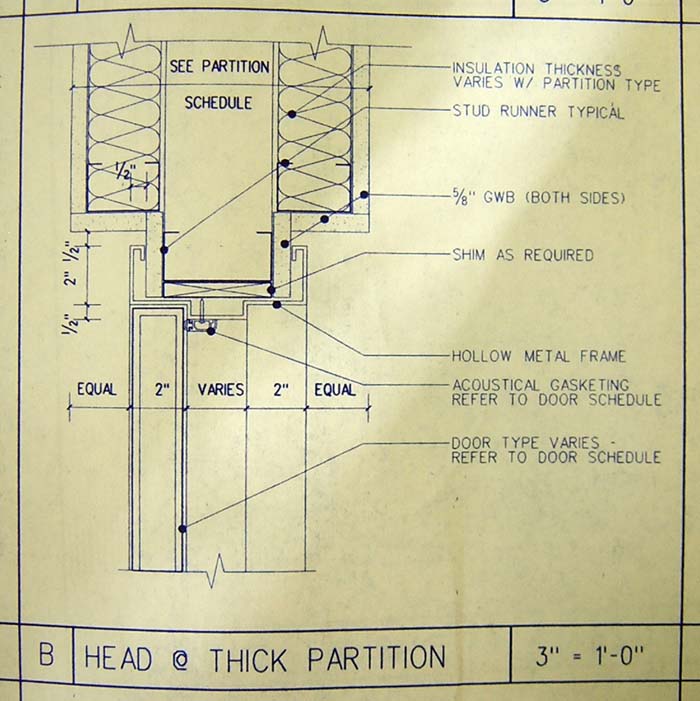
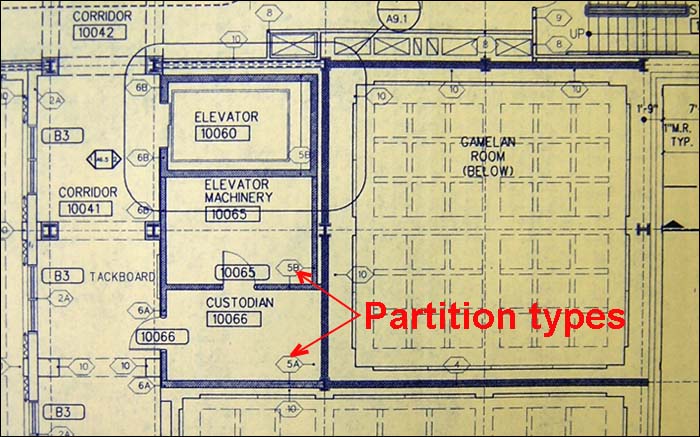
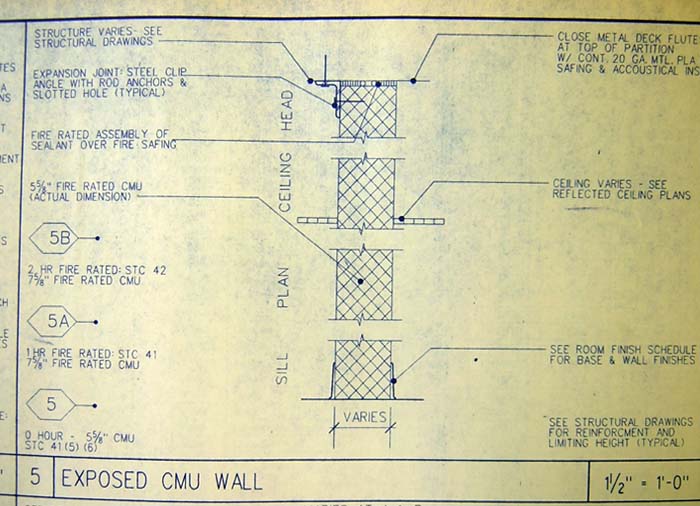
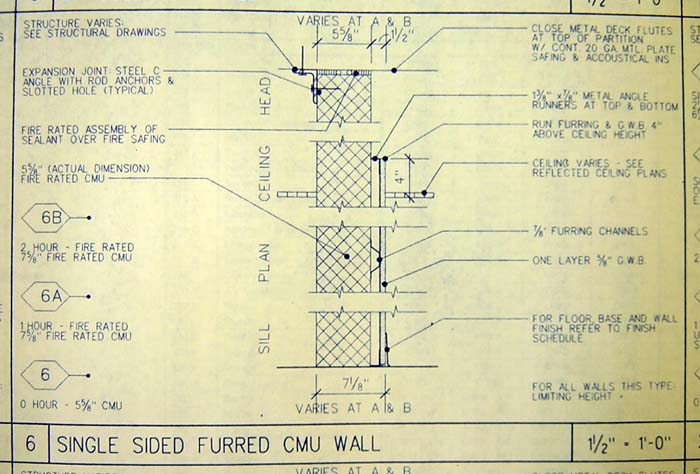
Partitions types are not usually defined in a schedule. Instead, typical partition details are organized and numbered on a drawing sheet; these numbers are then keyed into the partitions shown on plans.


The boards come in 4' x 8' modules like plywood, but when installed professionally are generally obtained in longer sizes to reduce the number of joints that need to be taped and spackled. The panels are screwed into wood or metal studs (nails were formerly used for wooden studs); edges and corners are made straight and strong by applying various types of "beads" made of metal or plastics and then spackling over them.
Typical gypsum board thickness is 1/2" or 5/8", but other thicknesses may be required where fire-resistant rated assemblies are called for. In the latter case, the gypsum board type is also somewhat different from the standard product, with a more fire-resistant paper used, and fiberglass fibers embedded in the gypsum matrix to improve the performance of the board in a fire.

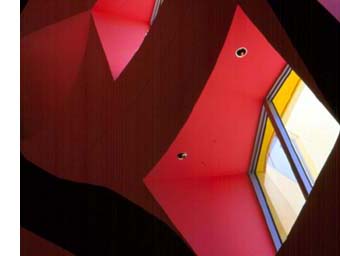
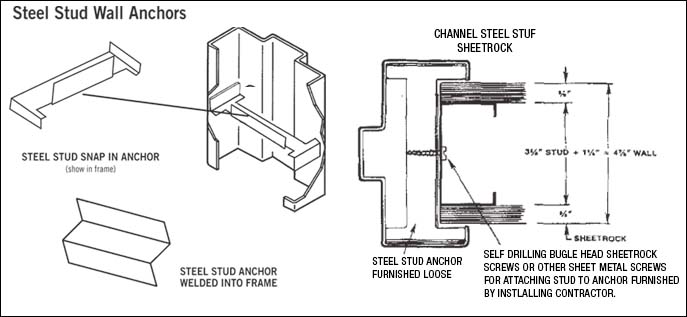
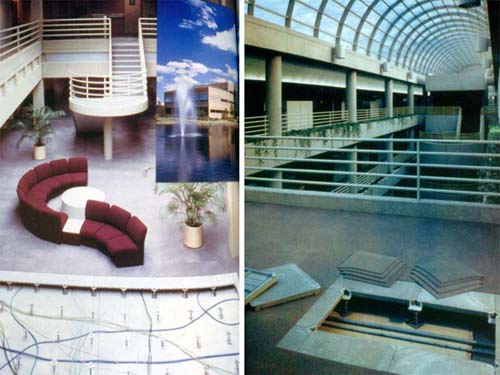
As shown in the image above (left), electric and other systems can be run in the stud wall, penetrating as needed in switch or outlet boxes which are then covered with face plates. Screw holes and panel joints are covered with spackling compound in 3 layers; a paper tape is used over joints (and inside corners) to prevent the spackling compound from cracking. Once spackled, the surface is primed and painted. Panels can also be bent to some extent; depending on the radius desired, multiple layers of 1/4" board may need to be used; for large radii, 1/2" thickness can be used. The right image is a project for Disney in Anaheim, CA, designed by Frank Gehry (both photos by J. Ochshorn).
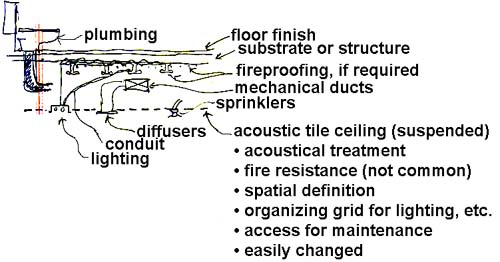
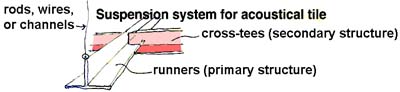
Typical acoustic panels come in various modules (1' x 1'; 2' x 2', 2' x 4', etc.) and are set into grids of painted steel that are hung from the structure above using wires or bars. Note that drywall can be suspended in much the same way.
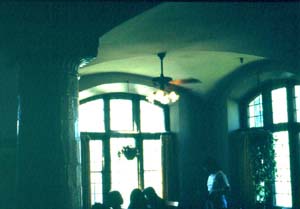
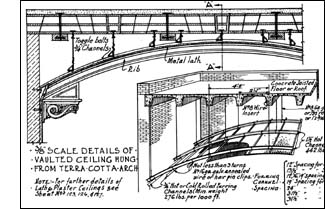
It is interesting to note that plaster ceilings were also suspended in certain contexts, using the same sort of hangers we associate with more modern gypsum board systems. The images below show Cornell's Willard Straight Hall (left, photo by J. Ochshorn), a steel-framed structure, and an explanatory detail from the 1932 edition of Architectural Graphic Standards.
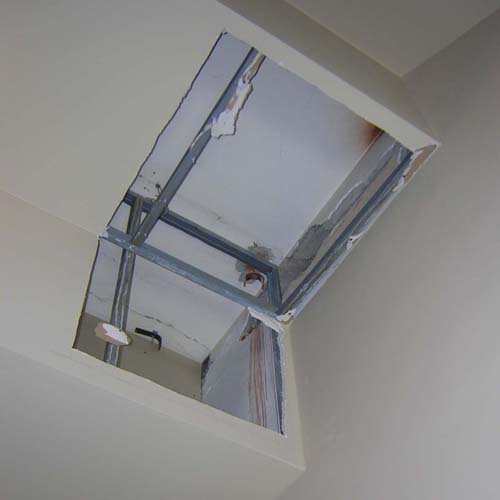
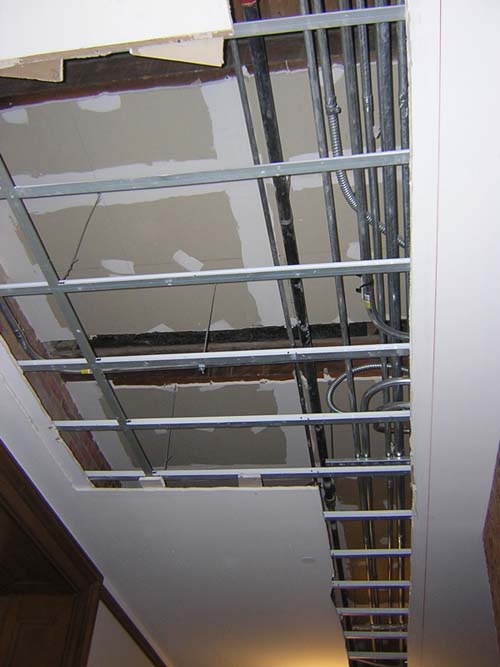
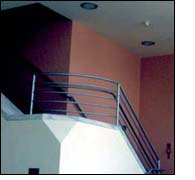
More conventional gypsum board ceilings are routinely hung using steel studs screwed together and fastened to the structure, as can be seen in the following two images showing renovations in the ILR Conference Building (first) and in Goldwin Smith Hall (second), both at Cornell (photos by J. Ochshorn, 2015):
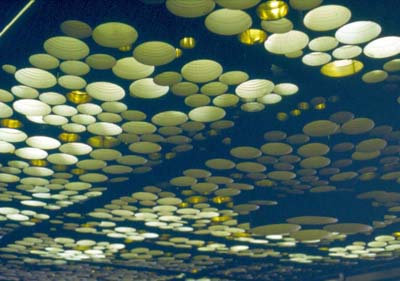
Many of the attributes of a suspended ceiling can be created with means other than commercially-supplied systems: the image below shows how architecture students fashioned a suspended ceiling system from recycled cans for Cornell's Green Dragon Cafe in the late 1960s (photo by J. Ochshorn).
 Note that paint is the ultimate finish material; both gypsum board and paint are classified as "finishes" even though the gypsum board is not literally seen (as it is covered with paint). The importance of paint cannot be overestimated. Here is Mark Wigley ("Untitled: The Housing of Gender," Sexuality & Space, Beatriz Colomina, editor, Princeton Architectural Press, 1992) on Gottfried Semper's attitude towards such layered construction:
"Semper's whole argument turns on the status of a coat of paint. He produces a history of paint within which the addition of a coat of paint to the surface of building is the way in which the original textile tradition was maintained in the age of solid construction. In this way, architecture, the 'mother art,' gives birth to the art of painting. This simulated textile, the painted text, becomes at once the new social language, the contemporary system of communication, and the new means by which space is constructed. Architecture is literally a layer of paint which sustains the masquerade in the face of the new solidity because it is 'the subtlest, most perfect means to do away with reality, for while it dressed the material, it was itself immaterial.'"
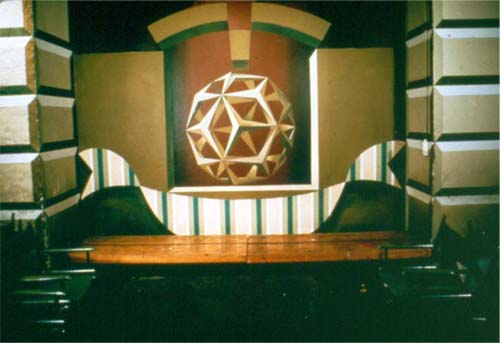
Paint as a finish can transform the appearance of a space, as in J.O. Mahoney's 1960s painting of the Green Dragon Cafe at Cornell.
And perhaps the most astounding use of paint (actually, fresco, whereby paint is applied directly to damp plaster) to transform a space is this:
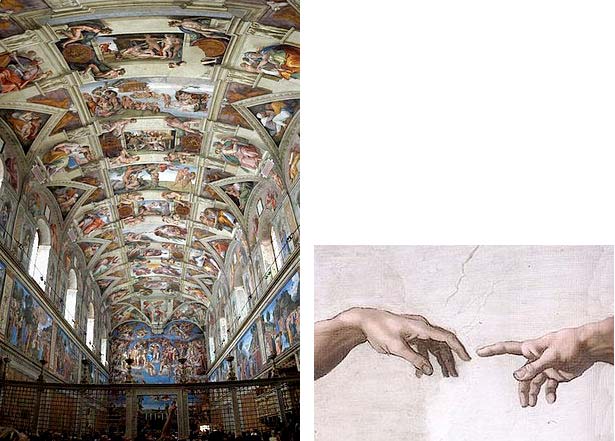
image source
Disclaimer: Students are responsible for material presented in class, and required material described on course outline. These notes are provided as a tentative outline of material intended to be presented in lectures only; they may not cover all material, and they may contain information not actually presented. Notes may be updated each year, and may or may not apply to non-current versions of course.
first posted Nov. 13, 2012 | last updated: Nov. 19, 2017
Copyright
2007–2017 J. Ochshorn. All rights reserved. Republishing material on this web site, whether in print or on another web site, in whole or in part, is not permitted without advance permission of the author.